Dapeng Town Industrial Park, Tongshan District, Xuzhou City, Jiangsu Province, China
Space frame bolt balls can be widely used in commercial buildings and industrial buildings and other places. The bolt balls have high strength, light weight and beautiful appearance. The products are more and more concerned and loved by builders. If you are interested in space frame bolt ball processing, please read this article.

1.Forging of bolt ball blank
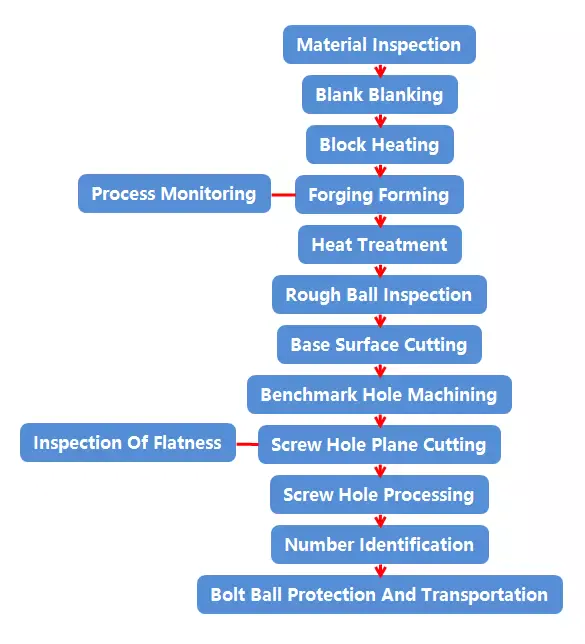
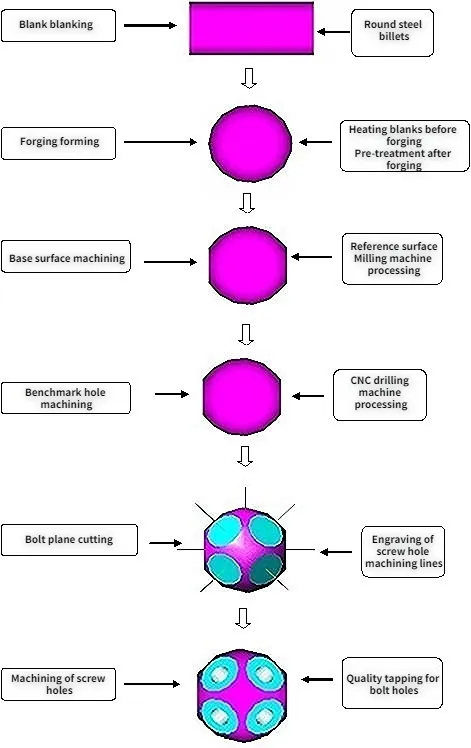
According to the diameter of the ball, round steel with different diameters is selected for blanking, the material block is heated, hot forged, and tempered to eliminate internal stress.
The bolt ball is forged with 45# steel, and the surface should be smooth and free of cracks and pits.
2.Processing of bolt ball hole
①.Machining datum hole: Clamp the ball blank on the lathe chuck, according to the requirements of different ball diameters, the size relationship between the datum plane and the center line of the ball, etc., make a datum plane cutting marking stop on the machine tool guide rail. Then carry out turning and milling of the reference plane, and then use the tailstock of the machine tool to drill and tap. The reference hole is the plane and the screw hole after the workpiece is clamped and processed in place at one time.
②.Machining the plane of other bolt ball holes: the ball blank is clamped on the indexing head of the milling machine by using the ball reference hole, and at the same time, the milling head of the universal milling machine is rotated to the position according to the index line according to the angle designed by the ball hole, and milled first The plane of the chord hole is milled, and then the plane of the web hole is milled. The angle between the holes is accurately indexed and positioned by calculating the number of revolutions of the orifice plate of the dividing head and the number of holes. The ball blank can be milled and machined all the planes of the bolt holes in one clamping. The minimum scale of the dividing head is 2′, so the machining accuracy of the included angle between the bolt hole planes is also high. The parallelism of two milling planes on the same axis is ≤0.1mm (D≤120) and ≤0.15mm (D>120).
③.Mark and center all the bolt holes on each ball on the test plate. This process is also regarded as an intermediate inspection link.
④.Bolt hole processing: Use the milling plane and the designated center to locate, drill, chamfer, and tap on the drilling machine. Thereby finishing all bolt hole processing on the ball blank. According to the above processing technology, it can ensure that the angle deviation between the bolt hole axes is not more than ±10′, the perpendicularity between the spherical plane and the bolt hole axis is ≤0.25r, and the thread accuracy requirements are also matched accordingly.
⑤.For the processed bolt balls, the machining accuracy and depth of the bolt hole thread; the angle accuracy of the bolt hole; the shear strength test of the inner thread of the bolt hole, etc. are inspected and tested. At the same time, mark each bolt ball with a steel stamp number according to the detailed design drawing.
⑥.After the surface of the bolt ball is shot blasted to remove rust and scale, and then process the threaded hole, after the metal processing is completed, the surface is coated with anti-corrosion coating, the anti-corrosion coating material used, the number of coatings, and the thickness of the paint film All performed as specified by design.
⑦.After the paint film layer is dry, seal each screw hole with a plastic plug. Before sealing, add an appropriate amount of lubricating grease to prevent thread corrosion, and facilitate the screwing of bolts in future installation.
⑧.Complete all the processing procedures, and check the qualified bolt balls, and put them into the finished product warehouse for shipment. The packaging box should be marked with: the name of the project, the construction division, the specifications of all the balls in the box, the quantity of each specification, the processing time, etc.

3.Bolt ball processing quality control and inspection
Sufficient processing accuracy is one of the main measures to reduce the assembly stress during the installation of the grid, and it is also an important prerequisite to ensure that the geometric dimensions and spatial form of the grid meet the design requirements, and it will directly affect the bolt holes and high-strength The axial tensile strength of the fit between the bolts, so our factory formulates the machining accuracy standard of the bolt ball joints according to the principle that the enterprise standard is higher than the national industry standard, and takes measures to ensure:
①.The space angle error between any bolt holes of the bolt ball is controlled within ±10′ (the national industry standard is ±30′). The specific measures are:
* The out-of-roundness of rough balls is within the range of 1.0mm to 2.0mm. Check with calipers and vernier calipers.
* Use the dividing head (minimum scale is 2′) to control, and use the milling machine to process the end face of the bolt ball screw hole.
* Regularly check the accuracy of fixtures, and the error control is ±2′.
②.The distance from the end face of the bolt hole to the ball center of the bolt ball is controlled within ±0.1mm (the national industry standard is ±0.2mm). The specific measures are:
* The diameter error of the rough ball is controlled within the range of +1.0mm~-0.5mm. Check with calipers and vernier calipers.
* The roundness error control of the ball is 0.75mm (D≤120) and 1.2mm (D>120). Use the precision of the forging die to control.
* Use special tooling, and regularly check the accuracy of the tooling.
③.Guarantee the machining accuracy of the bolt hole of the bolt ball, so that the thread tolerance meets the requirements of the 6H level precision in the national standard “Ordinary Thread Tolerance and Fit” GB197-81. The specific measures are:
* The threaded holes are processed by high-quality taps produced by SAFS Steel Structure Factory.
* The accumulative processing times of each tap is limited to 200 times, and it will be scrapped after 200 times to ensure the accuracy of the tap itself.
④.Finished ball processing accuracy inspection
* Use a standard thread gauge (bolt plug gauge) to check the threading accuracy and tapping depth of the bolt hole.
* Use a universal square to check the angle between the axes of any two adjacent bolt holes of the bolt ball, and the inspection quantity is 5% of the finished balls of each specification, and no less than 5 pieces.
*Use a universal testing machine to test the axial tensile strength of the threaded holes of the bolt ball and the high-strength bolts. The inspection quantity is 600 bolt balls of the same specification with the most unfavorable force as a batch (less than 600 still count as a batch), Take 3 balls from each batch as a group of random sampling inspection, generally check the largest screw hole on the finished ball.